Simon Says Stamp Feature

Hello friends! Happy Friday! Today Danielle has a post over on the Simon Says Stamp blog featuring some of our newest March release! Be sure to head over to see the project in full!

Have a great weekend!

3

A Trio of March Release Cards by Taheerah

Hey everyone, happy Wednesday! It's Taheerah here today to share some cards featuring the March release!

The wicked postman held my release package captive earlier this month so I didn't get a chance to join in with the other talented DT ladies - but that just means I've got the limelight to share them with you now!

Let's start with the first card:


For this one I used one of the irregular circles from Scandinavian Prints to create an irregular polka dot background! I used Distress Inks and Distress Stain to give it a watercoloured, almost ombre look.


I combined it with the starburst from Scandinavian Prints and a sentiment from Better Together for a bold, fun hello!


Next up, a sweet card featuring Itty Bitty Welcoming Committee!


I decided to watercolour *outside* of the image, using a mix of pale pink and gold. It's a fun change of pace to show that you don't always have to colour!


I stamped out just the banner again then trimmed out the banner pieces and adhered them on top for some dimension. I did the same to add that cute pink bow! I couldn't resist using another sentiment from Better Together too!


Last but not least, probably my favourite of the trio:


I loved combining several products for this one! I used the Hexastar Cover Plate to impress my background, and added a piece of vellum die cut with the Punchinella die. The flowers were created with Scandinavian Prints, using the accompanying Scandinavian Prints dies to cut the flower heads.


I customised my sentiment by adding the 'extra' - I think this card deserves to go to someone extraordinary!


I hope you loved these release projects as much as I loved creating them! The March release seems to have been uber-popular, with many of the new products out of stock currently - so make sure you sign up to notifications for your favourites to know when they're back in stock! Thanks for stopping by!

Supplies:
5

My Favorite Card with Daria

Hi Dears!

Daria here and I have for you a clean and simple card using one of my all time favorites stamps from Neat and Tangled. That is My Favorite stamp. Actually, it was the first one I bought, when only started my cardmaking adventure; and I am still in love with it :)

I am a big fan of white cards, and I wanted the sentiment to play the major role - so I've put it on some tags (using Classic Tag 1 Die) and embellished my card with a few gold and lavender stripes to make it more interesting and shiny :) I've also used an embossing folder with stripes to add a little something-something to my card base, without making it busy.
Love the soft and fresh feel of the card, I hope you do too *wink-wink*

Thanks so much for joining us today, and hope see you soon :)
Daria.
4

Belated March Release projects

Hey everyone, Mayuri here to share my cards for the March Release!

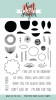
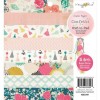
First up is a card using the new Scandinavian Prints set - I experimented with stamping the images using Dylusions Ink Sprays, and absolutely loved the result:

©Candles in the Garden. Neat and Tangled March Release

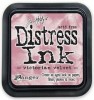
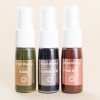
I began by spritzing a piece of watercolour paper with water and then carefully adding a couple of drops of Funky Fuchsia ink spray to my craft mat. I then tapped the largest solid stamp from the set into the ink and stamped onto the damp paper.

©Candles in the Garden. Neat and Tangled March Release

The ink plumed in some areas, whilst staying solid in others. I also did the same thing with one of the smaller circular images but this time with Pure Sunshine ink. I heat set the panel, and then stamped over the inky plumes with black ink and some of the outline images for a dramatic result! The sentiment was heat set in white on a strip of black cardstock and adhered to the front to finish off.

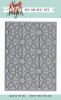
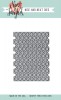
For my second card, I used the Hexastar Cover Plate to create a clean and simple, layered paper effect.

©Candles in the Garden. Neat and Tangled March Release

I die-cut the pattern out of three different coloured pieces of cardstock, and then trimmed each one apart at various points of the design. I then layered them on top of each other to create what looked like a mountain scene.

©Candles in the Garden. Neat and Tangled March Release

I applied Glossy Accents in small areas to adhere the pieces together, as well as to a white card base. I stamped a sentiment from Scandinavian Prints below the die-cut piece and added some sequins from the Gold Mix sequin collection.

For my last card, I used the Hexastar Cover Plate again, but this time as a stencil. I die-cut it out of some slightly thicker cardstock, and swiped through some Chartreuse Iridescent Creative Medium (Imagine Crafts) onto a dark navy panel and set aside to dry.

©Candles in the Garden. Neat and Tangled March Release

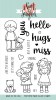
I stamped the image of the boy and teddy from Better Together with Archival Jet Black ink onto a piece of white cardstock and then coloured them in with Zig Clean Colour Real Brush Pens. I fussy-cut them out and set aside to work on the sentiment.

©Candles in the Garden. Neat and Tangled March Release


I trimmed the stenciled panel down to slightly smalled than the card base and foam mounted to the front. The sentiment was stamped onto a piece of white cardstock, trimmed and also foam mounted. To finish, I adhered the focal image next to the sentiment!

I hope you enjoyed these projects! Thanks for stopping by ;-)
5
Back to Top