Easy-Mail One Layer Scenes


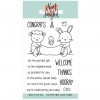
Hey there crafters, Happy Thursday! It's Nina-Marie here with you today to share a set of one layer scene cards featuring some of my favorite Neat & Tangled stamp sets!

I love creating sets of cards as I am working, as it allows me to have more cards on hand when I need them. A card design like this was super easy to make multiples of, especially when you do each step all at once on every card.


I started off my card by stamping all the elements first; the speech bubble (from A Lot to Say),  the sentiment "live for today" (from Bible Journaling and Christmas Journaling), and also the bird (from Itty Bitty Welcoming Committee). 

After stamping, I masked off the speech bubble and added ink around the outer edges using Simon Says Stamp's Maliblue ink. I also masked off an area to be the ground under the bird using a piece of paper die cut from a hill border die (the ink I used was Lime Green from Hero Arts). 


I then added color using my Copics; I colored the bird yellow, added grass blades on the ground using green markers, and created an ombre fill inside each of the letters on my sentiment. I love how the ombre gives the sentiment a lot more interest and helps it stand out off the card. 

For a final finishing touch, I used Morning Dew Crystal Drops and White Blizzard Glitter Drops from Nuvo to create some pretty texture to the sky, and I also used a white gel pen to add in a few smaller dots. They remind me of little raindrops in some ways, and gives the card a more whimsical feel. 

I hope you've enjoyed today's card project! Be sure to check back next week for the beginning of our July Release Week... the fun starts on Monday! 

Thanks for stopping by and spending some time with me; I'll see you again very soon!
xoxo, Nina-Marie 


SUPPLIES


SaveSave
6

More of Scandinavian Prints with Daria


Hi Dear Friends!

Daria here. You won't  believe, but this weekend, I again was playing with Scandinavian prints stamps and dies. I am in love with this stamp set and really wanted to create with it as many variants as possible. It is a really unique set as you can get so many different looks out of it.


For this card, I tried a technique taught by Jennifer Mcquire at Background Class at Onlinecardclasses - wanted to try it for a while already, and so happy I finally did.  It is all about embossing ressist.


At first, I losely watercolored some pink circles and added different shades of green in between. Last week, I also played with this stamp and die set - to create a stencil. I used the same stencil to have an idea where to color those pinkish circles.... Then, I heat embossed flowers and leaves shapes on top of my watercoloring using clear embossing powder. For the flowers, you can use the same stencil to apply embosing ink through it, or just turn the outlined flower shape stamp backwards, and stamp with back more solid side.


After it all was done, I blended Hickory Smoke Disstress ink on top of the whole panel. Heat embossed flowers and leaves resisted the color blending and created a very neat effect :)


Finally, I foam monted my panel over Neenah Dessert storm card base and finished with a sentiment from the same stamp set. I think that sentiments in the set are so delicate and add that perfect little touch of character.

I hope it gave you some ideas how to stretch your stamps even further :)

Thank you so much for stopping by.
xo,
Daria.


Products used:
Scandinavian Prints - Stamp Set
Scandinavian Prints - Nice and Neat Dies

4

A Shaker Shower of Love

Hello there!

Mayuri here to share a card using the Fractal Cloud stamp and die sets from the May Release!

 ©Candles in the Garden. June 2016 Neat and Tangled post. Fractal Cloud.

I created a watercolour background using a piece of acetate and some reinkers and then stamped the fractal raindrops onto the panel for some depth.

©Candles in the Garden. June 2016 Neat and Tangled post. Fractal Cloud.

I then die-cut the cloud aperture out of the panel using the Fractal Cloud die and stamped a sentiment from the coordinating set with black dye ink. I set this aside and moved onto the actual card base, where I stamped the large fractal cloud and then coloured in all the tiny segments with some ZIG Clean Color Real Brush Pens.

©Candles in the Garden. June 2016 Neat and Tangled post. Fractal Cloud.

I turned the card into a shaker by filling the aperture with sequins and foam mounting the watercolour on top, sandwiching the sequins between a piece of acetate and the card base.

I usually try to create a few watercolour panels in advance for cards like this, because you never know when you might need one!

Thanks for stopping by!
3

I Would Travel the World with You, a Fond and Colorful Farewell to Joan Bardee

Friday!  And of we're running a bit behind today, but better late than never.  Really, we just didn't want to have to say goodbye to our guest for this month, Joan Bardee.  We've so enjoyed her work this month, and today is no exception!

Before I share my designs, a very big thanks to Neat & Tangled for inviting me to serve as guest designer for June. It’s been an honor and a treat.
  
Love Neat & Tangled’s Origami Map stamp and die!  The design is so clever, and there are many different ways to use it (emboss, watercolor, paper piece, etc.). For today’s post, I used two techniques – hand stitching and simple die cutting. I hope you like them!

Hand Stitched


The straight lines of this set make it perfect for a little embroidery. If you decide you want to try this, here are a few hints:
  •  Stamp with a pale ink so that the embroidery floss will cover up the stamped image. I used pale gray ink and 2 strands of floss.
  • With a design this complex, poke only a few holes at a time.  Otherwise, you may inadvertently “annex” some of those small islands or join a few continents (just like I did and had to start over).
  • I did not stitch around the tiny islands -- just one stitch; otherwise the paper would have fallen apart.


  • When you are finished stitching, place the stamp image that comes with the set over your stitched image.  This will help you see where you might have stitched in the wrong place, or omitted some stitches. (I took this picture after I had corrected a few of my errors and the map image showed me exactly what my eye couldn’t see on its own.)
  •  If you need to remove a stitch, cut the floss carefully on top of the stamped image and pull the thread out from the back.  You might have to re stitch a few before and after, but it only takes a few mistakes to get the hang of it.


  • Practice stitching on different types of paper.  You want something that can hold up to the stitching. I used Essentials by Ellen Linen cardstock for this card, and it held up very well.
  • Once the stitching was done, I held my breath and die cut the image. The die is a perfect fit and no stitching was harmed! Whew.  It was a risk, but I love the outcome.  (You cannot stitch near the edges of the image after you die cut the image because the border around the image is narrow.)


  • If this amount of stitching seems overwhelming (it took me about 3 hours), you could stitch just the outline of the continents. 
  • Enjoy. All that stitching was relaxing!


Simple Die Cutting

 
Unlike the first card, this one took 5 minutes.  Truth!


Thanks so much to Joan for being our guest this month!!!
5

Awesome Thanks Card by Taheerah

Hey everyone, happy Thursday! It's Taheerah here today to share a fun Thanks card that you'll just love!

I hadn't had a chance to play with the Awesome Nice And Neat dies and it was time to change that! I decided I wanted to play about with a dimensional sentiment, minimal stamping, and playing with patterned paper. Sometimes it's great to use up some of those papers you've hoarded, right?

Here's what I came up with:


So happy at how much punch that sentiment packs! I die cut the word from some foam and some yellow patterned paper, adhered them together and added a healthy coating of shimmer on top of the paper! The 'base' of the word die is also cut from a contrasting patterned paper and the two work together so well!


I broke out the So Very Blessed stamp set to add the laurels on my panel to frame my sentiment. Thanks to my Mini MISTI I was able to keep everything lined up and in the right place!


The companion sentiment was made from selectively inking one of the sentiments in the Scandinavian Prints stamp set, and just works perfectly as a little accent! I used one of the stamps from the set to embellish my bottom right corner too, and another to frame my main sentiment too!


I hope you loved this card as much as I loved creating it! It's just perfect for saying thanks to someone awesome, wouldn't you say? Thanks for stopping by!

Supplies:
3
Back to Top