Lydia Evans is Mermazing!

DSC00155m 

Hello and happy Friday everyone! I'm sad to sad that this will be my last post as July guest designer here at Neat & Tangled. Even though I'm sad its my last post I am still so happy and honoured to have been asked to do it. It has been a absolute pleasure working with these beautiful stamps, so thank you so much for having me! Today I thought I would create out of my (floral) box and create something cute instead...... see I can do it ;)
  DSC00153

To start I created a watercolour background. I did this by covering a whole piece of watercolour card with fresh clean water and then dropped teals and blues tones (Gansai Tambi paints) into the wet card. I added the colours more at the bottom to create a sort of ombre look.
  DSC00155
I stamped the mermaid from Mermazing onto some paper using a light grey ink, I did this so I could then colour with Copics and pencils to create a no-line effect. I do love how see looks like this! I fussy cut here out leaving a thin white border to make her 'pop' more from the dark background. Once I had stuck her into place I added a Wink Of Stella to her and some Glossy Accents to her tail.
  DSC00156

To finish I added the sentiment from the same set directly onto the watercoloured panel using a bold black ink. Thank you so much for stopping by! I do hope you liked my cards this month and thank you for having me! Hugs, Lydia x
2

July Release Redux Cards by Taheerah

Hey everyone, happy Thursday! It's Taheerah here today to share some cards featuring the July release!

The wicked postman held my release package captive earlier this month so I didn't get a chance to join in with the other talented DT ladies - but that just means I've got the limelight to share them with you now!

Let's start with the first card:


For this one I used the sentiment and star image Hello You to create a bold, chalkboard look.


I did a bit of shadow stamping, with the help of my MISTI, to create a chalky look, and heat embossed the main images!


Next up, a couple of cards featuring the Succulent Journaling Card stamp set and die!


I die cut the journaling card from patterned paper and lightly coloured some of the pieces, before paper piecing them back in. The sentiment is from Square Thoughts!


Such pretty details!

And here's its alternative version:


This one is more subtle, but just as pretty!


Next up, Mermazing:


This one might be my favourite of the lot, just because of all the clever details!


I partially inked up the mermaid, and then stamped the shell to be her bikini and drew in her waist!


And just check out those waves! I used a combination of glue and ink to create dimensional froth which I then heat embossed!


Check out that dimension!

And finally, Kitty's Favourite Things:


I die cut a circle using the Making Waves dies and then wound a lot of twine round in, before inking and misting the twine to change its colour!


I coloured my kitty with Copics, trimmed him out and adhered him behind the giant ball! The sentiment banner was die cut using the Kitty's Favourite Things dies, and I added a heat embossed vellum heart using one of the stamps from Hello You. The background was created by misting, using both the Geometric Blooms and Pentagon stencils, placing them on top of each other before misting. I think it mirrors the ball of wool effect. :)


I hope you loved these release projects as much as I loved creating them! The July release seems to have been very popular, with a few of the new products out of stock currently - so make sure you sign up to notifications for your favourites to know when they're back in stock! Thanks for stopping by!

4

July Release projects

Hello there! Mayuri here to share some cards for the July Release - there's a great selection from this month's release, and I've experimented with a few techniques that I hope will inspire you! I've seen the watercolour trend showing up more in more in the card making world, and so I wanted to try a technique using Distress Inks and water.

For this first card, I stamped the shapes from Hello You in Picked Raspberry, Festive Berries, Shaded Lilac, Peacock Feathers and Salty Ocean all over a panel of white cardstock. I left a blank space in the centre for the sentiment.

©Candles in the Garden. Neat and Tangled July 2016 Release.

I then took a damp brush and went over the stamped areas with water, sometimes using a light touch and sometimes slightly heavier. I liked how quickly the water seemed to dry in some areas, allowing me add more colour and more water to create a sense of movement.

©Candles in the Garden. Neat and Tangled July 2016 Release.

I heat set the panel and then stamped the large sentiment from the same set with Versamark Onyx Black ink in the centre. I trimmed the panel down to the same size as my card base and adhered it straight down.

©Candles in the Garden. Neat and Tangled July 2016 Release.

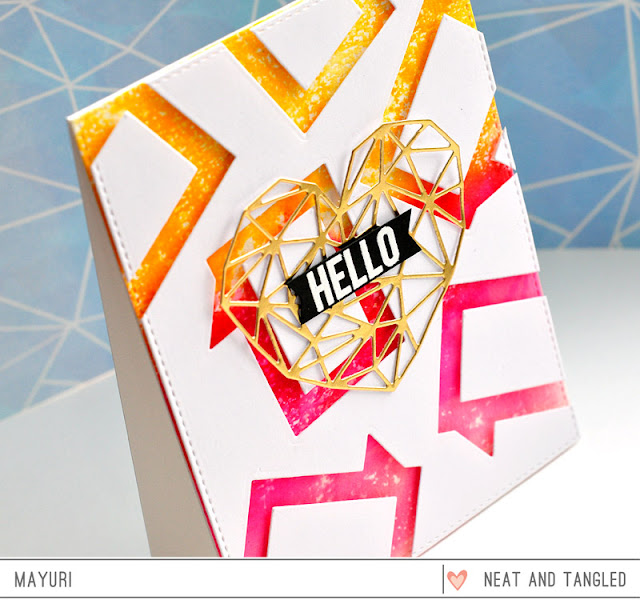
I added a few sequins and some gold splatters to finish up. For my second card, I took the speech bubble die from Square Thoughts and die-cut it several times from a panel of white cardstock.

©Candles in the Garden. Neat and Tangled July 2016 Release.

I held on to all the centre pieces that get cut out with the die so that I could adhere them all back in place. First, I took an inky panel from my stash and adhered it down to a white card base, and then I foam mounted the die-cut panel in place.

©Candles in the Garden. Neat and Tangled July 2016 Release.

I also die-cut the fractal heart shape using the Heart of Gold die and adhered that to the front of the card. The sentiment comes from the matching Square Thoughts stamp set and was white heat embossed onto a strip of black cardstock before being foam mounted to the front.

©Candles in the Garden. Neat and Tangled July 2016 Release.

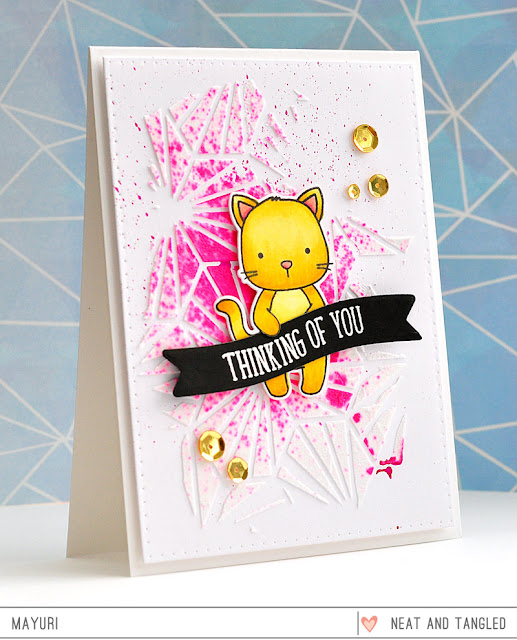
For my last card, I took the Geometric Blooms stencil, laid it onto a panel of white cardstock and swiped through some embossing paste. While the stencil was still in place, I also spritzed some Funky Fuschia Dylusions Ink spray.

©Candles in the Garden. Neat and Tangled July 2016 Release.

I removed the stencil and set the panel aside to dry while I worked on the focal element. I stamped the cat from Kitty's Favorite Things onto a piece of white cardstock and coloured him in with Copic markers.

©Candles in the Garden. Neat and Tangled July 2016 Release.

After my embossed panel had dried, I trimmed it down and foam mounted it to a card base. I die-cut the cat out using the matching die and also foam mounted it to the card front. I had added a little slit beneath his right paw so that I could tuck the sentiment banner underneath.

©Candles in the Garden. Neat and Tangled July 2016 Release.

The sentiment banner was die-cut using the die from Kitty's Favorite Things and a sentiment from Succulent Journaling Card was heat embossed in white. To finish, I added a few gold sequins.

Thanks for looking!

:-)
4

Succulent Journaling Card: Two Techniques - Two Cards

Hello Dears!

Daria here. And for today's post I have two cards to share both with Succulent Journaling Card Stamps and Dies using two different techniques.

Recently, I played with Pointillism technique by Heather Nichols, and could not wait to try it with Succulent Journaling Card Stamp.


How to: At first, I heat embossed the image in white. Then, I took all different shades of green inks and all small dots stamps from different stamps sets and started to stamps dots - over and over again. It is time consuming, but it creates very soft look with lots of dimension. While stamping, I put darker shades closer to the petals' inside parts and lighter to their ends... You also want to overlap your dots many times for continuous shading. I started with bigger dots and ended with smaller ones. 


I die-cut Succulent Journaling Card from Bazzil kraft cardstock and used some tiny strips of foam tape to secure it over my already colored card. It adds even more dimension.


For my second card, I have decided to do some in-laid technique. I die-cut Succulent Journaling Card several times from white and kraft cardstock. Then, on one of those, I colored petals with Twisted Citron distress ink using blending tool, keeping it more darker towards the center. As it was done, I in-laid all the small pieces into the frame.


I love this technique as it gives lots of visial dimension while keeping the card flat.  Here is a close up:


The sentiments for both cards came from the Succulent Journaling Card stamp set.


They turned out very similar, but also very different. Two different techniques - two cards. Hope you enjoyed.

Thanks so much for stopping by,
See you next time,
Daria.


8

Dry Embossed Succulent Journaling Card Die Two Ways


Hey everyone!  Miriam here sharing two cards featuring the Succulent Journaling Tag Die.

Rather than cut the die, I used it to for dry embossing.

This first card was hard to photograph, but I kept it very clean and simple.  You can see the embossing better in this close up shot.  I added a few mats to complete the look.


For the second card, I used a combination of watercoloring and Copic coloring to accentuate the embossing.  I started by watercoloring the different sections and then used Copics to add depth and texture.


Here's a close up.  I love the different looks you can achieve using this die, and you don't even need to actually die cut it!  The sentiments for both cards came from the Succulent Journaling Card stamp set.


Thanks so much for stopping by, hope your week is going off to a great start!

5

Find Joy in the Ordinary with Lydia Evans

Hi there everyone and happy Friday! Lydia here with you again for my third post as guest designer here at Neat & Tangled. You may have guessed it but I have another floral card for you today but this time we are going rainbow themed...
  DSC00120

To start I repeatedly stamped images from Send Pretty Mail and white heat embossed them allover the top part of a watercolour piece of card. I just love the different sizes of these images as they fit so well together and for those small empty spaces the dots fill the space so nicely.
  DSC00121

Once I was happy with the amount images I covered the whole piece of watercolour card with fresh clean water, and then added in drops of colour. I used Distress Ink as I love the way they blend and bleed into each other creating a beautiful soft look. I didn't colour the whole piece and yet let the colours at the bottom blend out by themselves, giving an ombre look.
  DSC00123

The sentiment is from Scandinavian Prints, I stamped white embossed this onto some white card to give this great contrast to the soft bright background. Thank you so much for stopping by and I'll see you again next week! Hugs, Lydia x
4

Recessed Panel + Distress Ink Watercoloring


Hey friends! It's Nina-Marie here with you today sharing a video tutorial featuring the new Succulents Journaling Card stamp and die sets, along with a few other Neat & Tangled products!

The Succulents Journaling Card set is a brand new stamp and die collection that just came out this month and I love how this stamp set makes it so easy to create stunning cards really quickly! I've paired these products with the Bible Journaling stamp set and a new stencil from Neat & Tangled (also released this month).


I used the coordinating dies to create a recessed panel into my card front; this is a great way to use your dies to give a whole new feel to a card design! I also used Distress Inks to do some emboss-resist watercoloring.


In the video below, I'll be walking you through the steps I took to create this card, as well as share tips and tricks that I felt might be helpful in your creative process!


I hope you've enjoyed today's tutorial! Thanks so much for stopping by and spending some time with me; I'll see you again soon! :D


SUPPLIES


SaveSave
4
Back to Top